Checkpoint 2: Make
the light blink
Goals:
·
Learn how to create an Arduino program (known as a sketch),
·
Learn how to upload an Ardunio
program onto the Arduino board,
·
Make an LED blink in a controlled fashion.
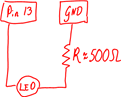
Step 1: Create the following circuit using your
Arduino development board. As always,
ask for help when you need it.
Note that in this case we are using a Resistor as a
current limiter. Once you look up
the specs of your device, you can choose a resistor that will give you a
desired voltage via V=IR. In our
case our LED’s spec sheet suggests a current of 1mA. The Arduino’s voltage is 5 Volts. This means that a 500Ohm resistor will
give us the desired current. There
are a variety of classes offered to help you learn more about circuits. For this workshop it is ok to follow the
suggestions in this packet or to ask for help.
Step 2: Plug the Arduino into the computer via the
USB port. If the USB port is working
correctly, the green “ON” light on the UNO should come on. The first time you do this, the computer
might also install drivers.
Step 3: Open up arduino.exe to write a new
sketch.
Step 4: Make sure that under “Tools” you select the
correct Board. Also under “Tools” make
sure that you select the correct COM port – you can either
simply guess the correct port and then try another one if your first
guess doesn’t work, or, you can go to your computer’s hardware settings control
panel to figure it out
Step 5: Type your program into the sketch area. Note that there are many example programs
under “File”, “Example”. Below is a very
basic “blink” program – a variation of this program should be available in the
Example menu – or, you can type it in yourself:
/*Blink
Turns on an LED on and off repeatedly.
*/
void setup() {
// First, you must initialize the digital pin
as an output.
// Note that Pin13 has an LED connected on
most Arduino boards:
pinMode(13, OUTPUT);
}
void loop() {
digitalWrite(13, HIGH); // set
the LED on
delay(1000); // wait for 1000ms
digitalWrite(13, LOW); // set
the LED off
delay(1000); // wait for 1000ms
}
Step 6: Upload your program to
the Arduino by clicking the “Upload” button.
As you Upload the program, you should notice that
one of the LEDs built into the board blinks rapidly.
Step 7: To convince yourself that you are really
making the light blink the way you are meaning to, attempt to reprogram the
Arduino to change the blink rate in a variety of ways.
Step 8: If time permits, borrow or purchase a 3-color
LED and have fun experimenting.
Troubleshooting:
Some problems can be fixed by…:
a)
…making
sure that your computer has administrator rights to allow programs to run.
b)
…going to
the “device manager” and making sure that the Arduino is working properly and
the drivers are correctly installed.